This one has been a long time in the planning - and quite a long time in the doing!
Our cottage came with a serviceable kitchen when we arrived in 2013 - it was perfectly useable, and allowed us to concentrate on other projects, but we weren't happy with it as a long term proposition. Looking closer, the installation was a bit slap dash, which is always a warning signal that corners might have been cut elsewhere; I wasn't disappointed in this regard, and it transpired that every possible corner had been cut!
We don't seem to have any pics of the old kitchen - here is a glimpse of it through brick dust. This is the view from the breakfast room.
As ever, I made a plan. Sketchup to the rescue again! For orientation, the builder in the pic above is standing by the wood-coloured bit at the bottom centre of the plan.
The kitchen has four doors in a room measuring about 4m x 3m - to accommodate everything would be a challenge. The doors are into the utility room, the larder, the large opening into the breakfast room and the door into the planned orangery which we will build this year. We toyed with the idea of an island, but the room simply isn't big enough. The solution we arrived at was to split the kitchen into four. The 'spit' (not quite an island - get it?) is bottom right which is a set of 800mm pan drawers, plus a cupboard for the microwave and pull out bin. The dishwasher / sink / dog food cupboard / fridge freezer is top right. Top left is more pan drawers (notice a theme?) with large wall cupboards above, and bottom left is the cooker and (yup) more pan drawers. We would also fit an extractor hood, which would be a real novelty for us!
Why so many pan drawers? One of my pet peeves is having to kneel down and move a large pile of kitchen things to get at other things behind, and you inevitably lose things in the darkest depths of cupboards. With drawers, the whole lot is easy to see and easy to access.
Let's get building then! I cheated a bit, and popped the Spit in last year or the year before - it gave us loads of storage that the old kitchen lacked. Again, no decent pics - this is the view into the breakfast room.
I started with the sink / dishwasher / fridge corner. Fairly straightforward, except I had to run new water lines, a new drain and extend the ring main to provide two new sockets and power for the appliances. I also had to cut down the fridge housing and the sink base unit as I hadn't checked the dimensions properly before ordering! The light switch also needed moving to the other side of the door. The new units almost match my Festool boxes...
The pan drawers corner and wall units were quite easy - I had to cut both wall units to fit around a water pipe and the consumer unit, and I spent most of a day recessing the main house water supply into a wall to hide it. Again, an extended ring main gave two new sockets plus a hard wired set of under counter LED lights.
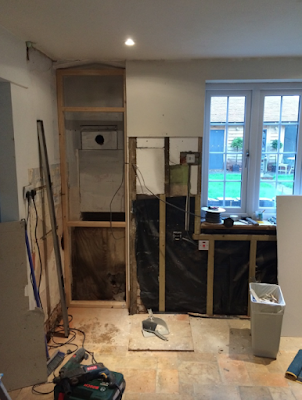
Now it was time for the disaster corner! The old under sink cupboard had always been a bit cold and draughty - I had assumed there was an old pipe hole through the inner brick wall into the cavity. I hadn't anticipated that most of the wall would be crumbling brickwork that had never been repaired properly - the old cupboard was effectively exposed to outside air. A previous renovation had seen plastic sheet attached to the brickwork to stop damp - the house has no foundation and no effective damp proof course. However, the plastic sheet was fitted so poorly that large gaps were left, creating mouldy plasterboard and an actual breeze in the kitchen.
About a week was taken up with putting all this right - new chemical damp proofing, new plastic sheeting and a lot of expanding foam sealed gaps where there shouldn't be gaps. Everything is now damp proof and finished properly - even the walls behind the cabinets are sanded and painted. Nothing screams 'bodge' louder than unfinished walls behind cupboards; I know that I'm the only person who knows it is done well, but as the saying goes - if it's not done right, it's done wrong.
Again, more wiring - two new sockets, a spur for the extractor and new cooker wiring (using 6mm cable, and not 2.5mm that was in place before). I also built a new stud wall on the left to create a smaller recess for fitted shelves - the existing brickwork will be demolished when we have built the orangery to make a cupboard.
New plasterboard up. This window will go eventually, to make a doorway into the orangery.
There are still a few jobs to do - fit the units around the cooker and make some floating shelves, fit all the plinths, trim around the wall cupboards, finish filling and painting etc. The new floor is going to be very exciting - we have tolerated old lino and bare chipboard for two and a half years - but finally the end is in sight! A new hearth for the woodburner and new skirting will complete the job - finally!


