Welcome to my blog, where a 30-something couple from the UK renovate and extend an old cottage, build some outbuildings, raise some hens and grow firewood trees and vegetables on our Acre in Hampshire. It's a bit like a smallholding but without too many animals, so we call it a homestead - living within our means, relying on ourselves and having a wonderful life!


.

Thursday 28 August 2014

More gucci Bosch kit arrives...

It's pretty fair to say that I drive a LOT of screws into stuff. Nearly all of them hold things together - aside from the odd one that misses...

I have relied on Ryobi kit for at least six years - and possibly more. I have two separate 'screwdriver-type' tools - a combination drill / driver / hammer drill (which only gets used for drilling holes) because I also own a Ryobi impact driver. These have been great - they use a common battery which are fairly cheap to replace - but they have a few faults. They are pretty heavy, the chuck on the drill is complete rubbish and needs a real crank to grip a drill bit, and they are quite long - I couldn't get them into a tight spot if I needed to.

Combine these shortcomings with the imminent start of the Barn build (where a second set of tools would allow two people to work at once) and the seed was sown - I could really use a second set of tools.

Using my mantra of 'buy cheap, buy twice'...

"Buying a cheap but inferior product is a false economy since it will need replacement"

...I decided to get some really good equipment - and as you know, I love Bosch Professional tools.

I really only meant to replace my drill / driver - but you know how these things are! I scoured the usual haunts and found a Bosch Professional GDR impact driver for £30 - the only drawback was that it needed a battery and a charger. I priced these up to about £50 - so imagine my delight when a perfectly-timed Screwfix email announced a promo for a Bosch GSR Drill Driver with battery and charger on offer at £50. Effectively a free drill - winner! 

Here is the GSR - the GDR is in safekeeping with Kristy's parents (they collected it as the seller was close to them...)


No serious testing has occurred yet - initial impressions are that it is a bit slower than the Ryobi, but about half the size and two-thirds the weight. It also has a task light on the front that illuminates before you start drilling (unlike the Ryobi...) and the chuck only needs one hand to tighten - a real improvement. No hammer drill function - so the old faithful Ryobi will need to stay in the workshop for a while yet...

Wednesday 27 August 2014

My manliest power tools yet...?

The construction of the Barn is going to be quite simple - great big bits of Oak with square ends will fit into square holes, and an oak peg will fit through a hole drilled through both parts. Easy enough - but how to actually MAKE these deep, square holes?

On my Oak Framing course, we tried both methods - you could drill a series of holes of a suitable depth (100mm, about 4 inches)...


...and then chisel out the waste...


All well and good - this is how oak buildings were made hundreds of years ago, after all. However, this would take about an hour for two holes - and I have 60 square holes to make just for my diagonal braces! I think we need a manly power tool...

After scouring eBay for months, this little beauty popped up - it's a Chain Mortiser, named because it uses a special chainsaw chain to cut a deep and wide mortise (a square hole, basically...) The only current manufacturer of a chain mortiser is Makita - and because they are the only player in the market, they can charge whatever they see fit - a new Makita costs over £1000.

Needless to say, when this Ryobi (who stopped making their machine some years ago) popped up on eBay for less than a third of the price of a new Makita, I jumped at it. As you can see from the plug, it is 110v - which meant I had to buy a transformer as well... still, lots of industrial tools are 110v - I won't be scared of buying tools with a yellow plug now.

Also on the shopping list was a large circular saw - to make the tenons (the square pegs which fit into the mortises) a series of cuts is made across the width of the oak post, and the tabs are then chiseled away - as seen here on a curved brace...

I needed at least a 60mm depth of cut - and my little Bosch circular saw would only cut to 50mm. More Man Shopping required! Another eBay bargain - this time a Bosch Professional 235mm saw, which will cut to 85mm. My main posts are 175mm oak - in case I need to shorten them, I'll saw around the perimeter and only be left with a 10mm square in the middle to cut by hand.

I really rate Bosch tools - they are very reliable in my experience, and the spare parts availability is excellent - a far cry from Ryobi (reliable, but poor spares). As such, any new tool purchases I make from now on will be Bosch unless I have no option.

On that subject, more Exciting Bosch Power Tool News coming to AnAcreInHampshire soon!


The AcreInHampshire Sinkhole...

We have our very own tip in the garden!

After our old Cess Pit was disconnected, we had a quandary - what to do with a 30 cubic metre underground bunker with 40 years of excrement soaked into the walls? A rash conversation with the sewage man had me pondering a storm shelter / doomsday bunker / wine cellar / man cave - a secret hatch in the lawn, with a ladder down - it would have been amazing! However, a bit of reading on the internet put paid to that - would you EVER be happy that it was clean? Really clean?

Anyway, to kill two birds with one stone, I asked Dickie (Groundworker Extrodinaire) to knock the top in with his Kubota, and to crack the waterproof bottom of the cess pit to ensure drainage. This would allow us to fill it with the tonnes and tonnes of hardcore and waste we would otherwise have paid to have trucked away - and would prevent the 'bunker' idea ever reforming in my mind!

Here it is - it was emptied and limed before being opened up. The planks were from the original formwork around which the concrete cap was cast.


Next up - POWERTOOLS!

A Pox on this House...

Where to start? We have had the most manic fortnight - which somewhat accounts for the lack of updates. Last weekend was the Reading Festival - and for us at work, it's a really big deal - pretty much the biggest event we have to work every year. Kristy and I were both working very long hours - I had to work 12 hour night shifts (five in a  row...) out of a set of eight days at work. Combine this with a bout of coughs and colds, and it has been a pretty slow start to our days off.

Fear not though, there has still been plenty of progress - this house / barn / homestead won't build itself!

Last week saw a HUGE delivery of all things concrete - loads of blocks and some bespoke-ordered pre-stressed concrete beams. A bit of a problem when the truck arrived - Dickie the Groundworker asked the driver "Where's the hi-ab crane I asked for?" to which the driver replied "Where's the fork-lift I was told you had?" Everything had to be offloaded by hand - which meant that the guys were half-dead before they had laid a single block.

The construction method is quite simple - the beams span between the rows of engineering bricks (themselves sitting on the trench fill foundations), and the blocks fill in the holes in between the beams. Whenever you order these beams, the suppliers provide engineering-spec load calculations to prove that they are correctly specified. I had changed the size of the groundworks by a fraction - which meant that everything had to be re-ordered and re-calculated. Never mind - do it once, do it properly is the motto!

Here are the beams in place, and the blocks going in. The electricity panel is poking through the blocks on the left...


The final row being added to the Garden Room, as photographed and Tweeted by a passing chaffinch...


The Garden Room as it stands now - a very runny mortar mix was brushed over the blocks to fill in the cracks. This adds a huge amount of strength - before this was added, you could 'bounce' the beam and block floor. Now, it's rock solid - and there will be more to come when it's insulated and a screed floor is poured.


The current view of the Barn looking south - all the soil has been roughly landscaped, but it needs a good raking to get rid of a lot of stones and debris before we dare scatter grass seed.


Loads more instalments to come this week - mostly about my new manly power tools! Watch this space...


Thursday 14 August 2014

A new look (B)log!

Do you like what I've done there? With the title? New log store, and a new style for the Blog!

Which first? Logs? Righto...

We have been caught out in the last year as regards log stores - we have FAR more logs than we can store under cover. Last winter I quickly chucked together some lean-to affairs next to the water trough - admittedly rather large for its only drinker (Monty) but perfect for when Kiwi comes to visit and decides to swim in it (yes really...) These stores were intended as a temporary solution, using some timber that I had salvaged from my parent's old pergola and a bit of Wriggly Tin for a roof. They looked pretty ropey but they served a purpose...

SWMBO (she who must be obeyed...) decided they looked a bit too functional, so something had to be done. I had a load of roofing slates to use up - I'd bought a huge batch when I re-roofed the workshop - and bought an extra pack of weather board when I'd stocked up for making the hen house. Here is the end result - much better, I'm sure you'll agree! 

There is a slight bend across the length of the roof as I used some reclaimed battens which were a bit undersize - next time, I'll add another rafter in the centre of the store.

The next bit of news is the new look for the Blog - do you like it? Anything you'd like to change? I'm also trying to integrate Facebook into the blog - have a look at My Facebook Page or click on the link on the right. There's not much to see yet, but that will only change over time.

Lastly, I braved the season's first Blackberry this afternoon!


There's not much more disappointing than a tarte Blackberry - so it's always a delicate balancing act between delaying the consumption to avoid bitter fruits and actually eating the things! I'm very pleased that I nailed it this year... We deliberately let our hedges grow this year - we have the prospect of blackberry jam from fruit grown on our own land to look forward to - another first!


Tuesday 12 August 2014

Ready for Hens!

We had a good taste (ha ha) of the amazing eggs that garden hens provide when we were waiting to move into our house. We managed to organise six weeks of house-sitting to tide us over between moving out of Eastbury and into our new home. Part of the deal was to feed the hens - in return for as many eggs as we could eat. There were only four hens to look after, but we still struggled to keep up with production - and they were the egg-iest eggs we had ever eaten!

We lept at the chance of some hens at home, and all our neighbours mucked in to help us out. One neighbour had some surplus fertile eggs, a second had a broody hen and a third had a spare ark - so the prospect of locally born hens laying home layed eggs loomed. Alas, Mother Nature had other ideas, and only one of the five eggs hatched...


Next, we needed an enclosure. I fancied the idea of hens free to forage the garden, but this wouldn't have worked for a number of reasons. Monty loves chasing moving targets - he had a nip at a fleeing hen when we were housesitting - so hens roaming about wouldn't last five minutes. I ordered some fence posts and rails, and some specialist stock fencing with very narrow holes - to keep hens one side and border terriers the other! A six foot gate finished the job - big enough to get the tractor mower in if we need to. Note the rails fitted at ground level - these serve two purposes. Firstly, they reinforce the bottom of the stock fence against digging dogs, and secondly they will allow me to mow and strim right up to the stock fencing without the strimmer line catching and pulling the wire fence.


Lastly, hens need a hen house. Anything well built and nice looking was north of £400 - and funds are rather tight with all the groundworks we are having done. I did a bit of internet research and decided to crack on with my offcuts pile and spare slates from the workshop move. I am delighted with how it has turned out - and I've only had to spend £15 on the feather edge boards. All ready for some hens now!


Thursday 7 August 2014

What happens when you run the tap?

NB - a word of warning. The subject of this post concerns poo. Scat fetishists and prudish grandmothers, please look away now.

Back in our old house, we had the modern day luxury of mains drainage. We could run the tap to get the water cold, have a bath whenever we fancied and flush the loo to our heart's content. We had no idea of the luxury we were experiencing...

When we viewed our house over 18 months ago, we saw a rather misfitting (and clearly stolen at some point...) British Telecom manhole cover balanced on the lawn. Our estate agent dismissed it - "Oh, that's the septic tank - never needs emptying, and of course you won't pay a sewage fee with your water rates. Don't look inside, the fumes will overcome you and you'll fall in and drown in your own excretions". OK we thought - not a perfect system but that's what you get when you live in a sleepy corner of the rural idyl.

As it turns out, it isn't a septic tank (which percolates waste water into the ground) but a cess pit, which collects every last drop that goes down the sink, loo, washing machine, dishwasher, bath plug etc etc. And the reason it 'never needs emptying' was that the previous tenant (when it was rented...) used to borrow a farm tractor and suck everything up with a trailer, before spreading the effluent on his unsuspecting Landlady's fields. No wonder the grass is lush...

Unable and unwilling to pollute the groundwater, we had to have the blasted Pit of Horrors emptied by a friendly man with dirty fingernails. I didn't shake his hand, nor did he offer - he's been in the business too long for that sort of thing. He bought a big wagon with a long hose, and took 3000 gallons (12,500 litres for we youngsters...) of effluent away, all for the (un)reasonable sum of £275. Little did we know that he would have to return three months later. And again after another three months. This was getting expensive. We started showering at work.

Something had to be done. We needed something that would treat our waste water so that we could run the bath without having to mentally calculate the cost of draining the water (0.45p per litre, in case you are interested - or about 40p per bath) We had two main choices - a septic tank that holds solid waste (yuk) and drains untreated water into the water table. This was not ideal as the water table rises close to the surface during the winter - poor percolation caused by the clay soil doesn't help either. This left us looking at a sewage treatment plant - a mini version of the kit Thames Water use. It introduces oxygen into the sewage which encourages bacteria to break down the waste, producing clean water which we can discharge into a ditch or stream. Fortunately we have a handy ditch!

We settled on a tank from Marsh Industries - mainly because you only see a manhole cover in the lawn, unlike most other systems. The ground workers dropped it in a huge hole dug in the north west corner of the garden, not far from the Barn. The site was chosen as 1) it was close to our ditch, for ease of discharging the treated water 2) it needs about 45w of power to run the treatment compressor 3) we plan to have a loo in the Barn and 4) there was nowhere else for it.

So, enough waffle - some pics of the site!

Location - just to the right of the telegraph pole that is in the top left hand corner of this pic. Our neighbour's house is top left, ours is on the right...


New trench from our existing manhole towards the new treatment plant.


Looking into the nice new treatment plant through the manhole cover - it looks a bit like a fish farm now! Dirty water enters into the left hand chamber where heavy waste (yuk...) remains. Dirty water overspills into the centre chamber where it is aerated by pumped air and agitated by the floating plastic 'pine cone' things which you can see under the mesh. Clean water then overspills into the right hand tank - some is circulated back into the dirty side to produce some flow. When the clean side fills up enough to trigger the float switch, clean water is pumped out and discharged into the ditch. Clever stuff - but nice and simple with no moving parts to corrode or service.


This is the view we will see above ground - the orange pipe will be cut down, and the concrete pad on the right will house the compressor for the aeration.


Finally, fill the trench back in and enjoy the ability to run the tap for as long as you need!


Tuesday 5 August 2014

Extension Groundworks

This extension was always going to be a 'one day' project. Doing the groundworks now serves four purposes;


  • We get the chaos and mud of Groundworks out of the way in one hit (as it turned out, the weather was very kind and there was not a jot of mud...)
  • We can start to plan and build new paths and flower beds - the concrete paths we have at the moment are horrid...
  • If we have the groundworks complete, we will be more likely to build an extension in a couple of years - the job will be much easier.
  • We are spreading the cost of the project - I guess that the groundworks are a good 40% of the cost of a job like this.
So, the guys pressed on. 

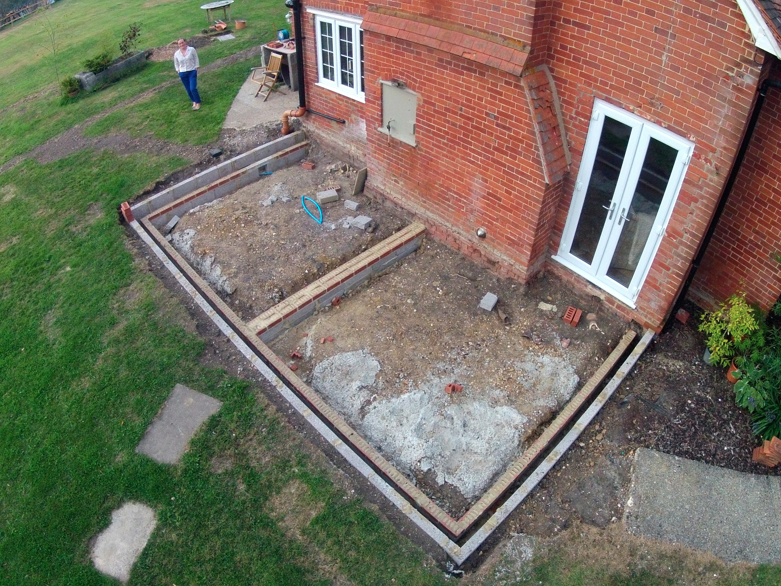
As before, scrape some trenches through the clay until we reached gravel. Richard chopped through the water supply pipe in doing this - they were very careful and excavated round the old pipe by hand, assuming it was still pressurised. Never mind - no lasting damage done.


A quick blob or two of concrete...


Richard doing some more pipework on our supply pipe - I got him to fit a stop cock before the house, and we tee'd into this for the feed that runs to the Barn.


And some blocks and bricks to finish the job. This angle on the GoPro makes it look massive - it's only 3.5 metres from the inner wall of the extension to the french doors.


Tomorrow, I'm going to tee into the water supply again and run a water line to the front of the house (under the beam floor...) in order that we can have an outside tap at the front. It's the sort of job that will take 10 minutes now, but about three days after the beams are in place!


Barn Groundworks - condensed!

It has been properly manic here for the last fortnight since my last blog update. The good news is that the groundworks are mostly done - we are just waiting on a few bits to finish off.

Here's how the last two weeks have been;

Kit. Proper Kit. This is the site of the Barn with Groundworker Richard's JCB, mini dumper and very gucci Kubota excavator. My Landy looks on forlornly, feeling inadequate for lack of anything hydraulic...


The guys quickly scraped out some trenches. They really are some trenches - over a metre deep, in order to reach through the layer of sticky clay which lies under the topsoil. 


The next day, three concrete trucks came (I was at work so missed all the excitement...) and poured the trench fill concrete for the barn. I stuck my GoPro to a pole to get some drone-looking pics.


Fast-forward a week and the block guys have been in - this is the outline of the barn, and the beams (whenever they arrive...) will span from the centre line to the outer row of engineering bricks. 

You'll notice the power distribution board in the top right of the barn - our sparky did a ton of work in one day to get power from the consumer unit in the kitchen, through the attic above the downstairs loo, down the side of the house, through a trench and into the barn. He has wired a waterproof consumer unit and socket to the post, in order that I can run my power tools on the slab when I'm machining the oak for the barn frame. There is also a spur from this distribution board to the new sewage treatment plant (top left in the pic below...) to power the aeration pump and treated water lift pump. 

We also fed a water line from the house supply to the Barn - and even fitted a stop cock, which we didn't have before!

Next - the extension...